
Modern Knock Down Stool
This post is Sponsored by 3-IN-ONE
I recently did a video on the Family Handyman YouTube Channel where I showed how to build this knock down stool/side table out of plywood and basically just using a jigsaw.
I decided I wanted to experiment with different materials and different ways to create the joinery, so here we go!
Check out the full build video below!
Links below are affiliate links, clicking on them helps me keep this site going at no extra cost to you :)
Plans for this build can be found here —> KNOCK DOWN STOOL PLANS
Before we get started lets talk about tool maintenance. Router bits and saw blades can start acting like they are dull when pitch and resin starts to build up on the teeth. In order to prevent pitch from building up on your blades, it’s a good idea to use some dry lubricant.
I recently picked up a new ripping blade and I want to make sure it will keep cutting like it’s new for longer, so I used 3-IN-ONE 100% Dry to Touch Dry Lube.
All you have to do is apply some of the dry lube onto your blades and it will dry super quick. Once dry, you’re ready to work again! You can get some 100% Dry to Touch Dry Lube here —> https://www.3inone.com/products/dry-lube/. Find 3-IN-ONE Dry Lube at a store near you: https://www.3inone.com/shop/.

After ripping all the boards to about 5” wide, I glued up two panels that will make up the base so that they will each be 10” wide.

After the glue dried, I cut them to length, which is 20”.

These two panels are going to lock into each other using a cross lap joint (or half lap, I’m not sure what to call it....)
To mark out the joint, find the center on the edge of one board widthwise. Then find the center of the other board lengthwise.
When you align that second board onto the first board you can easily mark out where the joint needs to be cut.

Make a mark on the edge of one of the panels thats halfway down, about 10”.
Then line up that mark with the bottom tooth of your table saw blade so the blade wont go past the 10” mark.
Once the board is set in the correct position you can clamp a stop block to the back of the fence.

Next align the blade with the cut lines you marked out earlier and adjust the fence so it will cut right on your marks.
Run the board through until the leading edge hits the stop block you clamped on. Turn off the saw, flip the board over and repeat the same process.

Since the table saw blade is curved it won’t give you a straight clean cut, you need to extend the cut lines to your mark and clear out the waste.
I did this on a bandsaw, you can also use a jigsaw, scroll saw or handsaw.

The cuts on the bandsaw from clearing out the waste were not perfect so I used a chisel to finish cleaning up the cut.
It was so satisfying when these two pieces snapped together so nicely.

Moving on to the top!
The cross lap joint of the base creates an “X” shape. In order for the base to fit into the top, you need to create a mortise in the shape of an “X”.
To do this, I made a jig/template.
I ripped a scrap piece of plywood to the thickness of the material I used for the base then cut it into 4 smaller pieces.
Then I took 4 squares of scrap plywood and marked about 2” from the inside corners on all the pieces.
I lined up all the skinnier scraps I cut at that 2” mark and glued it all together.
Because those skinner scraps of plywood are the same thickness as the material I used for the base, the gap leftover to create the “X” is going to be the perfect size for the base.

I had this spalted maple piece that I had already cut into a circle for a previous video… You can watch it here, if you’re interested.
I put the template I just made and placed it in the center of the circle, then marked out the outline with a pencil.

I removed the bulk of the material at the drill press.
I could not reach the center of the circle on my drill press, so I finished clearing out the waste with a hand drill.

I’m going to be using a router with a flush cut trim bit to refine the mortise, so before I put a router in there I needed to remove all the pointy parts that were left over from the drill bit.
If you didn’t remove those pointy parts, it would be pretty dangerous because the router bit could catch on one of the points.

I used double sided tape on the template I made earlier and simply traced the “X” using a pattern bit.

After doing one pass, I could remove the template and run the router through the mortise again.
You don’t need the template anymore because there is already a smooth surface you created in the first pass for the bearing to ride along.

I didn’t have a long enough pattern bit to completely clean up the mortise so I swapped out to a flush cut trim bit that has the bearing at the bottom.
This way I could flip the circle over and the bearing will ride along the smooth portions I made in the previous passes to finish cleaning up the mortise.

Now, I think that’s pretty cool looking…

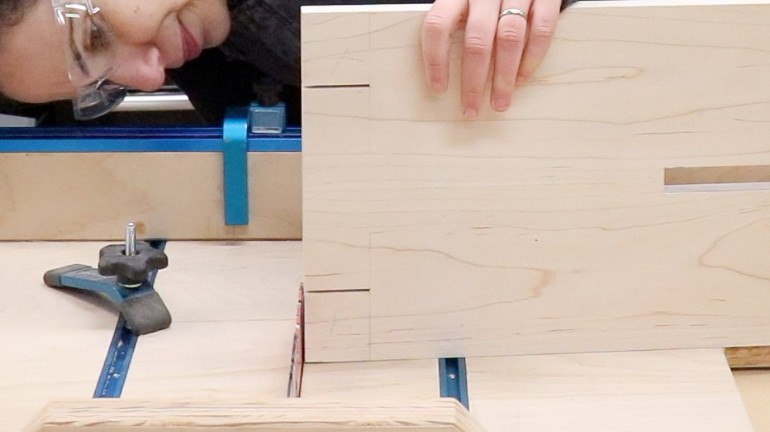
Now that the mortise was done, it was time for the tenons.
On the base pieces, I marked for the thickness of the top and brought my table saw blade up to that mark.

Then I set a stop block at the fence so the cut would be made for the perfect sized tenon.
I repeated the same cut on all the top corners of the boards.
Note, one of the boards has the cross lap joint at the top, the other will have the cross lap joint at the bottom.

To complete the tenon, I put the board on its edge and raised the blade to the height of the cut I just made.
Then moved the stop block so the blade will cut on the mark that is the thickness of the top.
Repeat the same process to the 3 other corners.

Because I made the mortise with a router, the corners were round, so the square tenons I just made did not fit.
Instead of squaring off the mortise, I decided to round off the tenon.
This was done really easily with a chisel and fine tuning with a rasp.

All the joinery is done, but I just wanted to add a little bit of a modern flair to the stool.
So I made a mark 2-1/2” from the edge and 13” from the bottom.
Then I connected that mark to either corner to create an interesting angled shape.

I cut away at the sides using a jigsaw, then I cleaned up the cuts on the belt sander.
I forgot that I wanted to make a template for this also so the cuts would be more consistent. Oh well…

I chamfered all the edges at the router table using a 45 degree chamfer bit.
But for the bottom of the top, I wanted a more drastic angle, so I turned the top on edge and used a 30 degree chamfer bit.

To match the black in the spalted maple top, I decided to dye the base with India Ink.
The ink is water based so you need to raise the grain before applying it. That means you need to just put water onto the wood and let it dry. After it’s dry you will feel little fuzzies, thats the grain raising. You can just knock those down with your final grit sandpaper (I used 180) then you can apply the ink.
The idea is that the grain will only raise one time so it’s kind of like a preemptive strike.
Simply pour some of the ink onto the wood and wipe it all over with a rag. You want to try and remove any excess.
After it dried I finished it with a couple layers of satin spray lacquer. You don’t want to apply a topcoat with a brush because it might remove the black color as you’re brushing. Spraying is the best option.

And It’s done!

I absolutely LOVE how the black tenons look when viewed from the top, it is such a cool look.

My kids have been calling this the “puzzle table” and they just think it’s so cool also. It would be a really fun project to do with the kids and they could customize it by painting it whatever color they want.
