
Sunburst Veneer Guitar

This is my entry for The Great Guitar Build Off 2020, a guitar building competition for charity.
Crimson Guitars sent a few makers their guitar kits to modify and then auction off for charity, so you have a chance to win this guitar! You can bid on it here - BID ON MY GUITAR
All proceeds for my guitar will go to St. Jude Children’s Research Hospital.
If you want to build your own guitar from a kit, check out Crimson Guitars and use the code: 3x3custom10 at check out to get 10% off!
Also, make sure to check out the Great Guitar Build Off website to check out all the other competitors - Great Guitar Build Off
The full build video is linked below if you’re interested in that as well!
Links below are affiliate links, I get a small commission if you click on them, at no extra cost to you ;)
Guitar Parts
Switchcraft 3-Way Toggle Switch
Let’s get started! I used this uncut kit from Crimson.
The coolest thing about this kit, all the hard parts are done… The neck pocket, control cavity, and pickup cavities are all routed out all already, all you need to do is decide what shape to cut it!

To determine the shape, I marked out all the cavities on a piece of 1/4” MDF and started drawing a shape that looked good based on those components.

Then I cut it out at the bandsaw and really refined the shape with some sanding.

Once I was happy with the shape I measured for what size material I will need for the veneers.
To do this, I used the bridge pick up as the center and made lines at every 15 degrees.

Then I prepared some stock to those measurements at the miter saw and table saw.

I resawed the veneers from that stock at the bandsaw. I cut these to be less than an 1/8” but more than a 1/16”.

To cut the veneers at 15 degrees, I made a simple jig at the table saw.
I simply used a brad nailer to attach a small scrap block to another larger scrap at 15 degrees using an angle gauge.
Then screwed toggle clamps to the smaller scrap block.
I also used some double-sided tape to temporarily put an offcut support on the left side (right side in the picture) of the blade.
Then I stacked a bunch of the veneers together and cut them all at once!

Using tape, I pulled all the veneers right next to each other in a pattern that I liked.
I taped this up into 2 halves because I knew some of the angles were probably slightly off… You can see there is a huge gap in the middle of the picture below… not to worry, there’s a very simple fix to this!

I sandwiched the veneer halves in between two pieces of MDF to act as a straight edge and support for the pieces.
I just laid down a bit of double-sided tape between each layer and all the pieces were secure to each other.

I made sure to the veneers were overhanging the MDF evenly, then I could use the edge of the MDF as a straight edge against the fence to trim off the excess.

Now when I pull the 2 halves together, there is no more gap! Awesome.

Now that the veneer is all figured out, I rough cut the body to shape at the band saw.

Using calipers, I marked on the side of the body how thick the veneer pieces are because I am going to need to remove that amount from the top so the neck fits into the pocket properly.

Before doing that though, I traced out the pickup and neck pocket locations on a piece of paper. This will come in handy later…

Using my planer, I removed some material from the top of the guitar.

And glued the veneer to it!
I made sure to get glue in between all the veneer pieces.

Then clamped the veneer to the body and left it overnight to dry.

After it was dry, I put on the template using double-sided tape and cut as close as I could possibly get to it at the bandsaw.

Then flushed up the guitar with the template using a flush trim bit at the router table.

Be really careful where the bearing is running when doing an operation like this!

Using that traced paper from earlier, I was able to easily locate the pick up locations and marked them with an awl.

Then drilled a starter hole in both locations.

And used a flush trim bit in my trim router to clean them all up!
I did the same thing for the neck pocket.

Time for some shaping! I used a Kutzall Shaping disc in my angle grinder. This was SOOO fun to do!

Then did some fine shaping with a shinto rasp on the neck just to make it fit the shape of the body better.

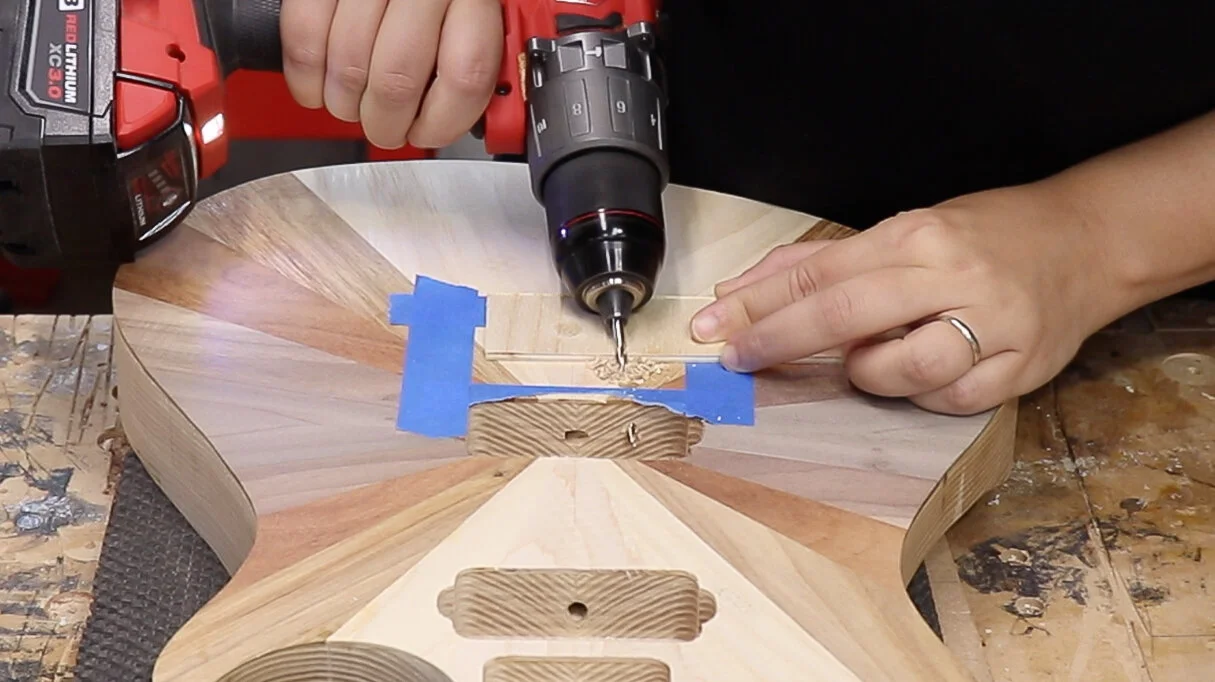
Now the part I was dreading… Drilling all the holes to connect all the inner cavities.
I used an extra-long 1/4” bit to connect the 2 pickup cavities starting from the neck pocket.

This kit had the audio jack hole already drilled into the control cavity, so I drilled straight through the audio jack hole to connect the control cavity to the bridge pick up.
I used the 1/4” bit here as well, but I think I should have used a larger bit since it was a tight fit for all the wires.

I used the holes in the back of the guitar as a guide to drill the string through holes into the top.

Then I temporarily put the bridge into place to mark out a safe location to drill a hole to ground the bridge.
This wire will sit under the bridge and go into the bridge pick up cavity then it will go into the control cavity where it will be soldered to one of the pots.
Once again I used the existing holes from the kit to drill from the back for the knobs and selector switch.

I almost forgot that I had to shape the neck! I rough cut it on the bandsaw and refined it with sanding and a spokeshave.

To connect the neck to the body I used ferrules and screws.
I placed the ferrules into the neck pocket so I could see that they were in a good location, then marked out their centers with an awl.

Then I drilled straight through to the back using an 1/8” bit at the drill press.

Using a smaller hole here allowed me to temporarily put the neck in place and use those holes on the body as a guide for where to drill on the neck.

After the holes on the neck were drilled out, I used those 1/8” holes again as a guide for the correct sized forstner bit to countersink the ferrules.

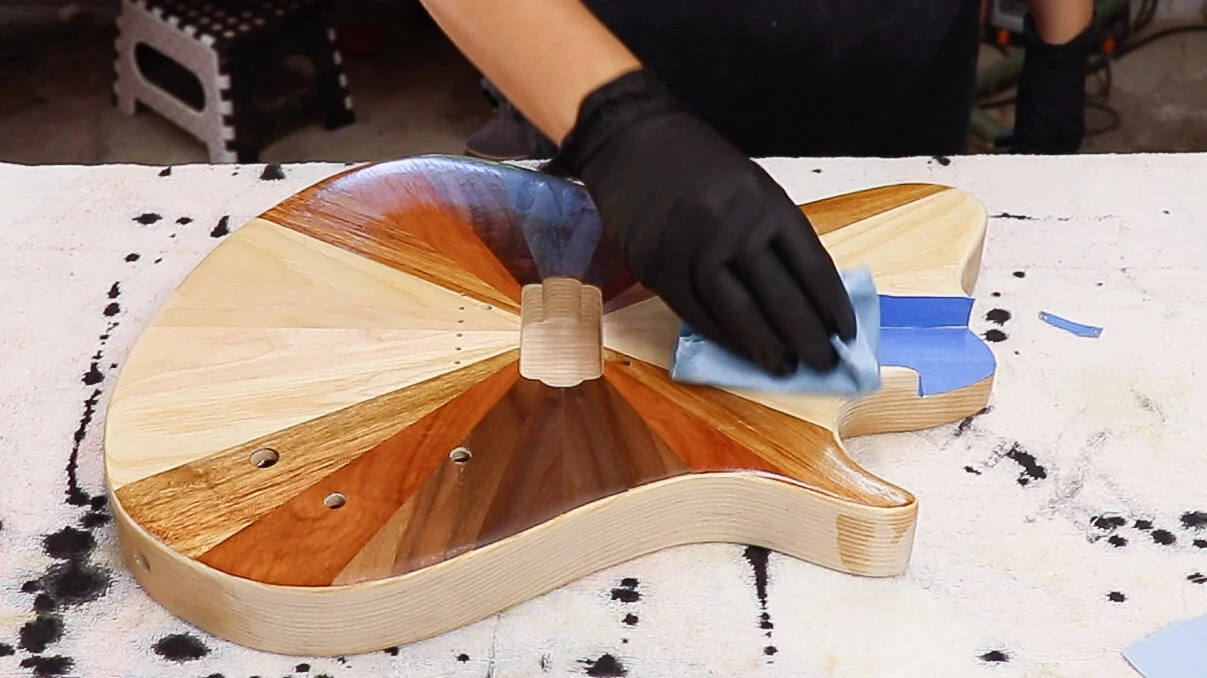
All the prep work is done! I sanded for a good couple of hours… Then time for finish!
I put on 6 coats of Crimson’s Penetrating Guitar Oil then did a final coat of wax.
Onto the wiring!
I decided to make my life difficult by using two Push Pull pots so that I could coil split each Humbucker. While the wiring for this was a bit confusing, it is super cool that this guitar can make 8 unique sounds.

I lined the cavity with copper foil to shield it, then soldered the Pickups to the pots and selector switch.

Final steps here!
I attached the neck using the screws and ferrules.

Screwed on the Audio Jack Plate.

Closed up the control cavity.

Installed the tuning pegs.

Hammered in the string through ferrules.
(I probably should have done this before I did all the wiring…)

I then installed the nut, the High E, and Low E strings to get the correct bridge placement, and locked down the bridge with screws.
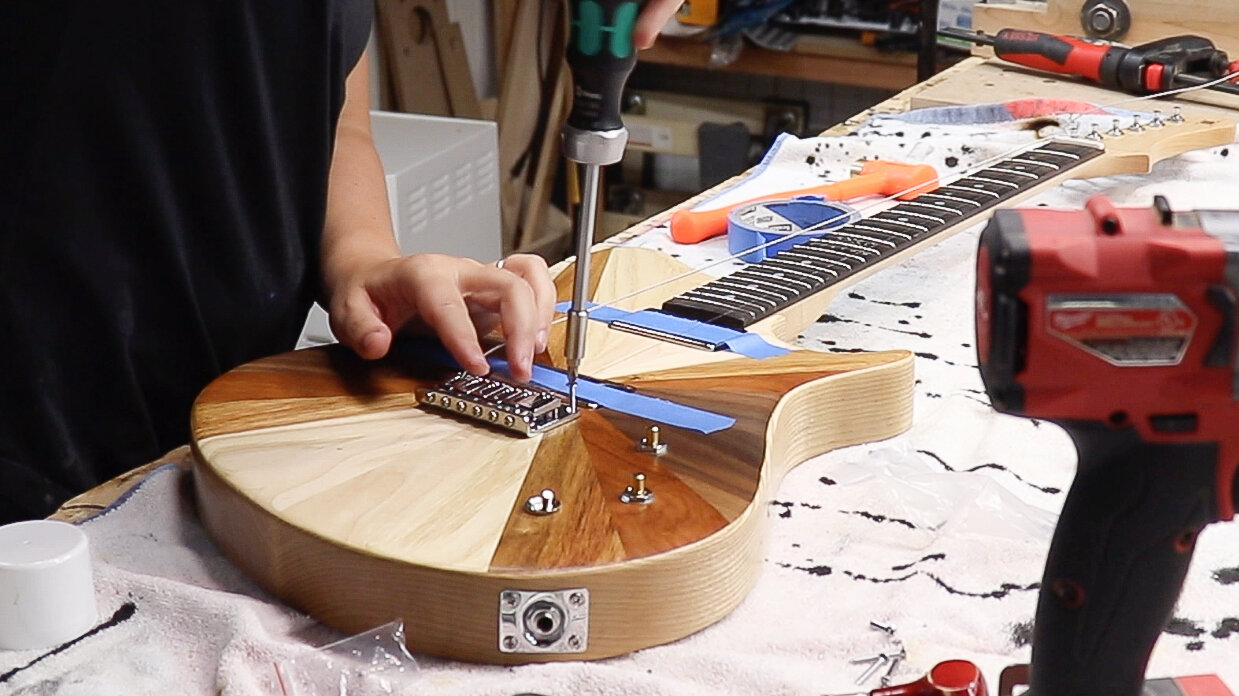
Screwed the pick ups into place.

Locked down the strap buttons.

Oiled up the fretboard.
(Check out my logo on the 12th fret!!!)

Installed the string trees.

And lastly, locked on the knobs!

And it’s done!

I love how the veneers turned out on the front and I love the shape of the back as well.
This was so fun to create!

I really wanted to make this as comfortable to play at the higher frets, so I carved out a lot of wood on the backside and also used the ferrules instead of a neck plate (Which I always find to be uncomfortable.)

I am so thrilled with the way this turned out, I am going to be really sad to part with it, but it is for a good cause!

I had so much fun experimenting with these veneers, I totally want to come up with more designs using this technique.

Make sure to check out all the other builds, there are some pretty talented people involved in this competition!
