
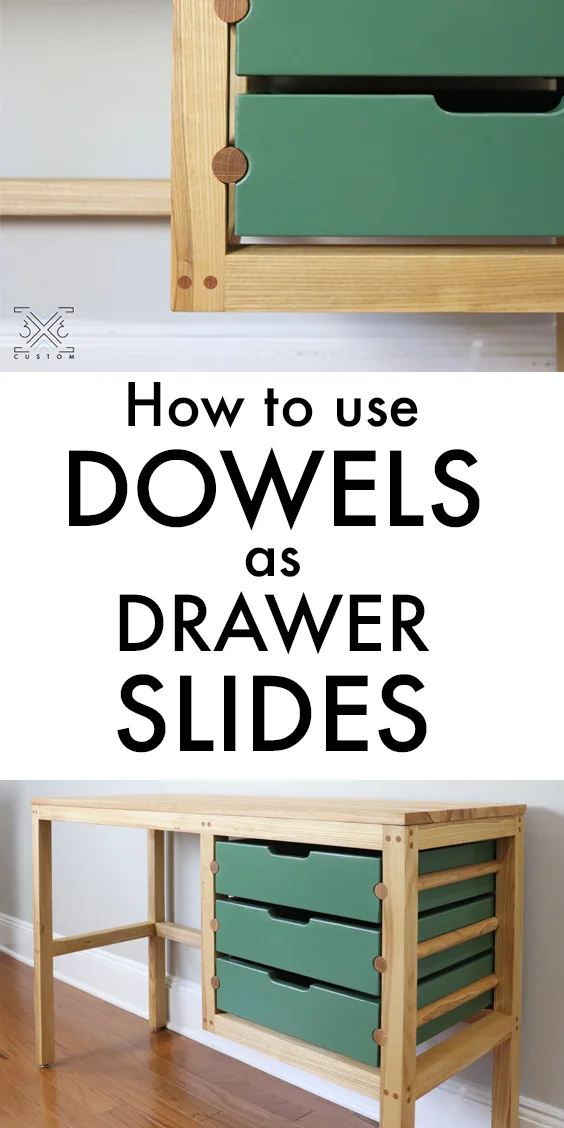
Building a Desk with Dowel Drawer Slides
This desk build was part of the Instagram Builders Challenge. The IGBC is an awesome opportunity for builders from around the world to compete with each other by building their own unique versions of the same project. There are amazing prizes to be won and friendships to be made.
This season on the challenge the plans were drawn up by DIY Huntress, in order to have gotten these plans, you had so sign up the challenge. Since They are not my original plans, I’m not going to share them, but check out Sam’s (DIY Huntress) site for other amazing plans.
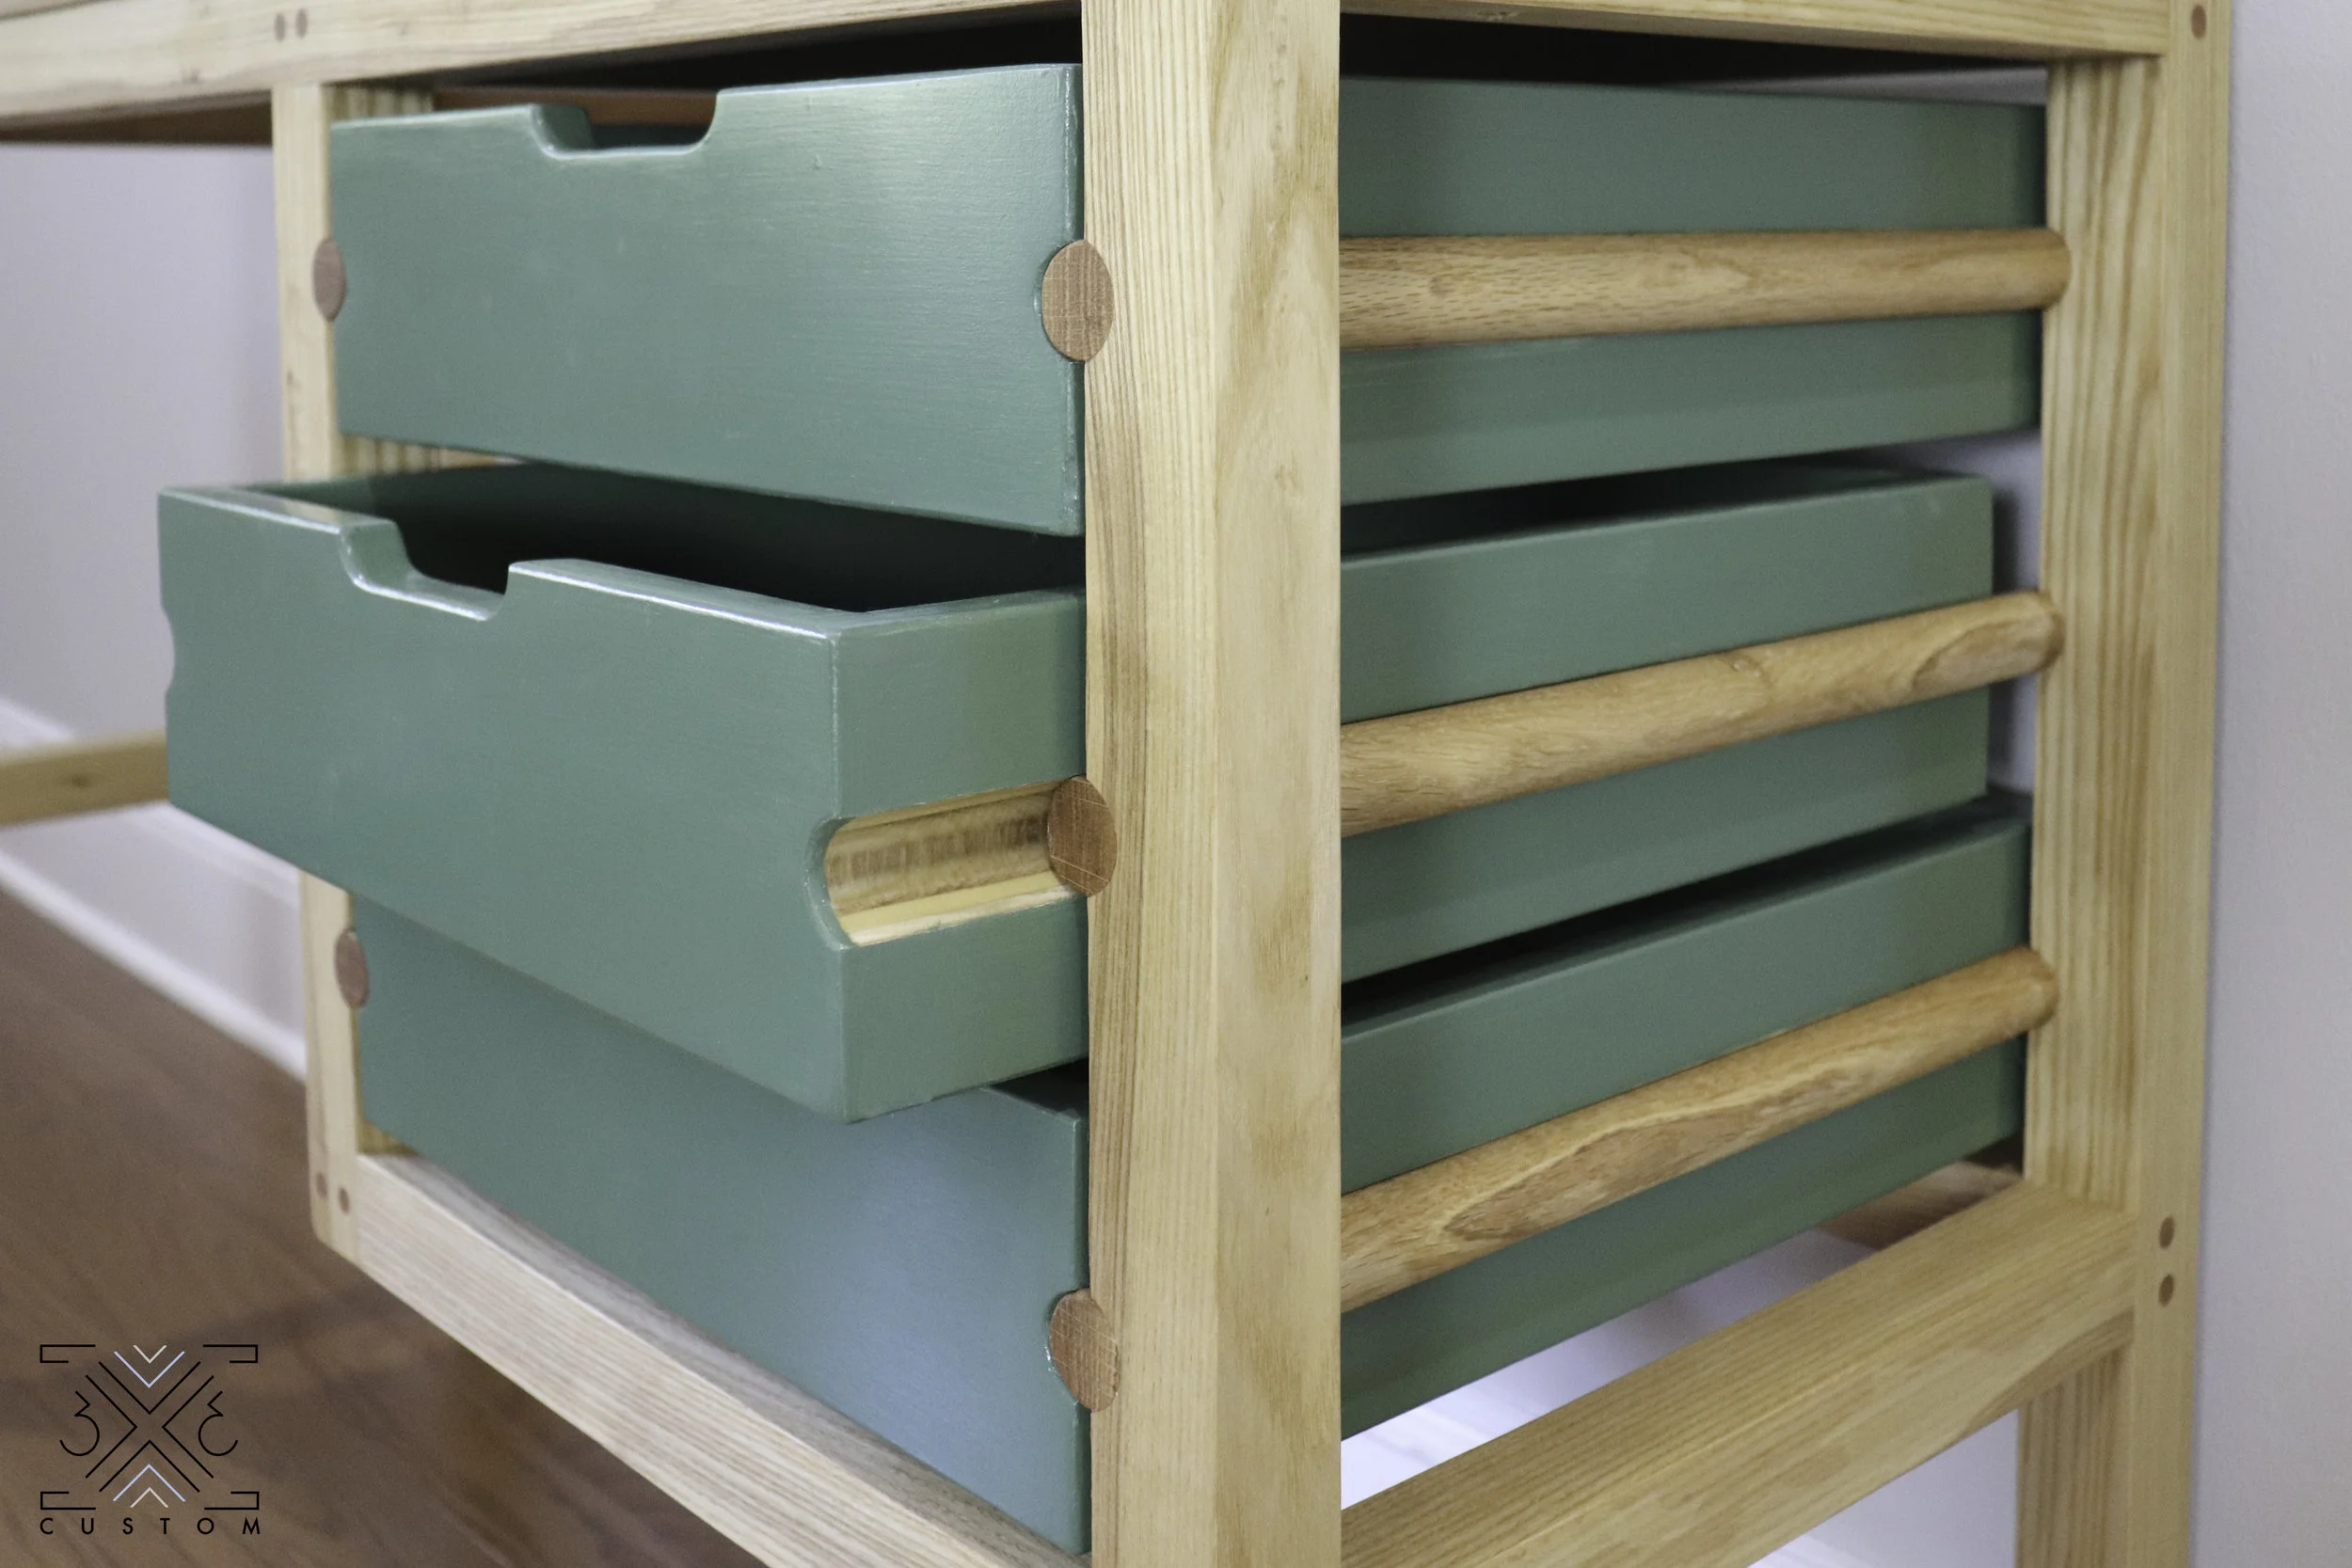
I decided to try out something new for the drawer slides and use a dowel instead of traditional hardware or square wood. This was really challenging to figure out, but in the end really simple to do!
Check out the full build video below to see all the details.
Links below are affiliate links, clicking on them helps me keep this site going :)
Before Starting the build I wanted to make sure it will fit in the space. Yes you can use an ordinary tape measure, but lasers are more fun.
When working with clients, it’s best to seem as professional as possible. When you show up to a client meeting with a laser measure, they know you mean business. In this case my son was the client so it wasn’t necessary, but he sure thought it was cool.
This Bosch laser measure can measure up to 165 feet! It has a full color display and you can even send your measurements to the free Bosch app on your phone via bluetooth. As a measure 40 times, cut twice person, that is super handy.

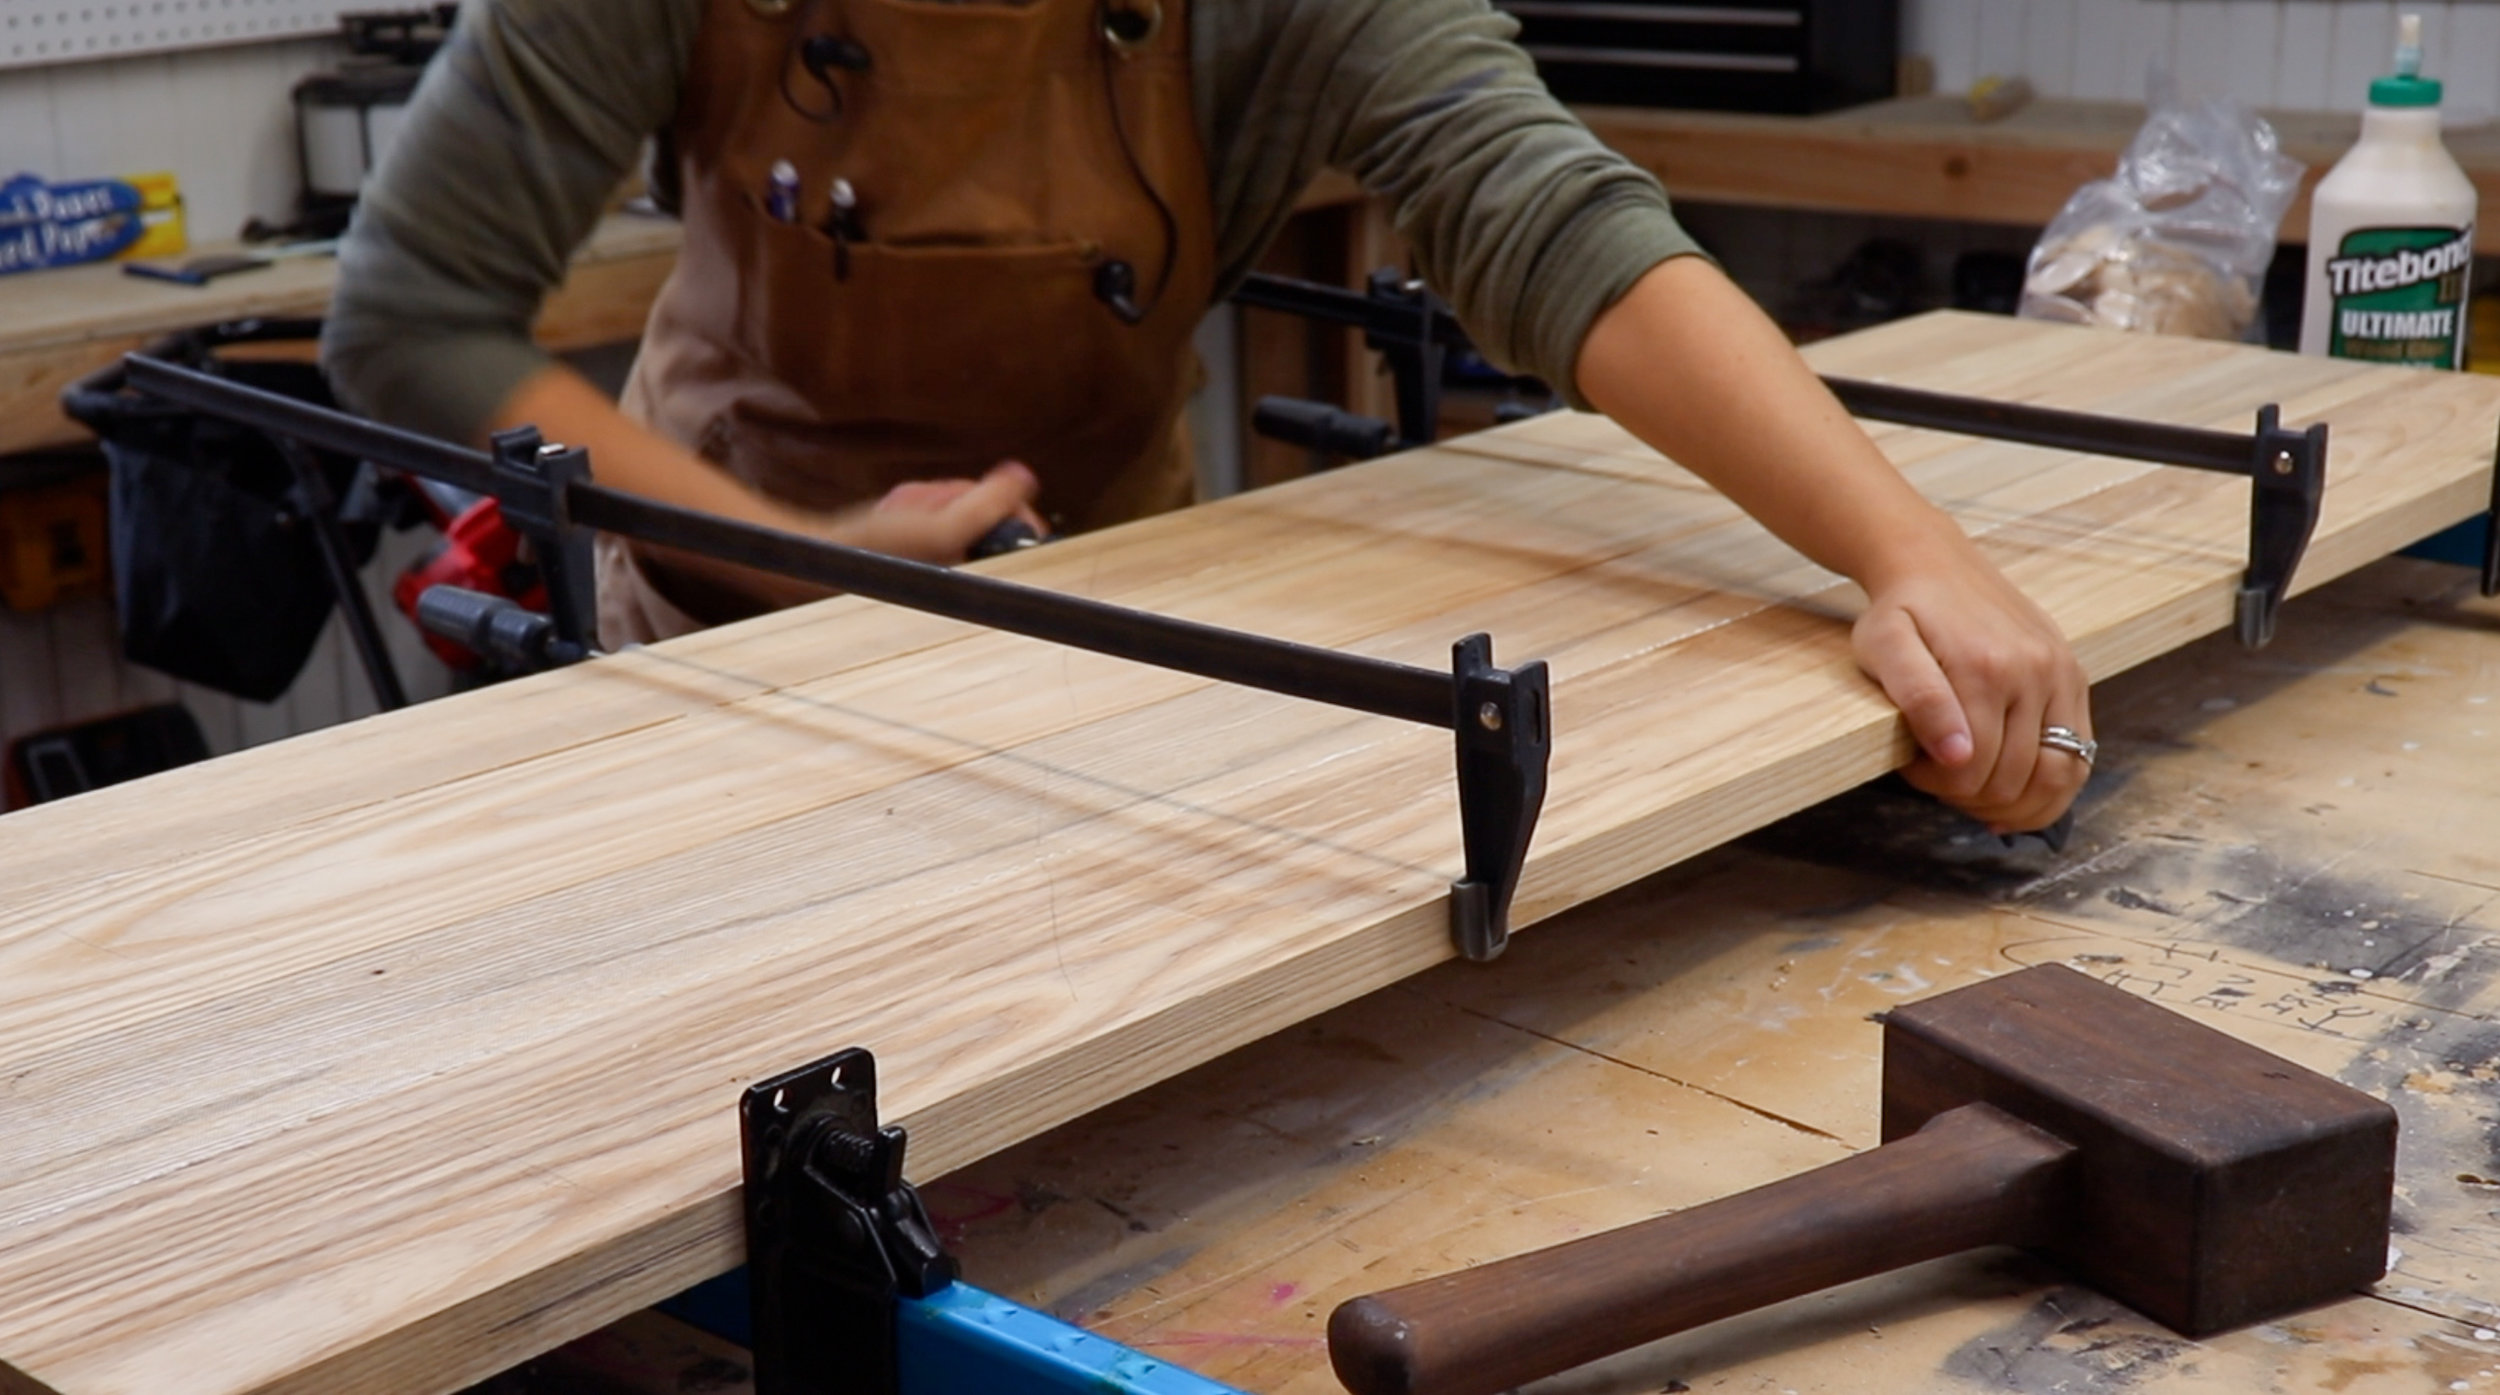
After taking all my measurements, I started this build with the top.
It made more sense for me to start this way so I could build the base to fit the size top I ended up with after milling.
I decided to use biscuits in the glue up to help with alignment and it worked out great.
(See the full video for how I did this on the router table.)

I clamped everything up overnight, then I was able to take measurements for the base which is made of 2x2 material.
I cut all the 2x2 pieces to size and it was time to figure out the dowel drawer slides…

I wanted to cut a half circle into the pieces that will hold the dowel slides, so I lined and marked all those pieces up.
I had to use spacers that were the same thickness as the desk stretchers to make sure all the holes will line up correctly.

I decided to use a 1” dowel for the slides, so I figured I could make the half circle cut out using a 1” forstner bit on the drill press.
In order to get a perfect half circle on each piece, I clamped the two pieces together before drilling.
This way, if I lined the center of the bit where the two boards meet, each pieces will have a perfect half of a 1” circle when I unclamped them!

I decided to do some test cuts before actually drilling into my work pieces and I am super glad I did!
The process worked, but I realized the actual drawer would be touching the legs if I made the same size half circle on it. Or I would have to make a smaller sized half circle on the drawers….
That didn’t make my OCD happy…

I did a few more test cuts and I really liked the result of using a 1/8” spacer between the pieces while drilling.
You can see in the picture below there is a gap between what would be the table leg and the drawer. There is also the same sized half circle on both pieces. OCD happy now.

I went ahead and drilled all the holes on the drill press by clamping the pieces together with a 1/8” spacer between them.
The holes were pretty even, but there were a few minor inconsistencies.
To fix that I clamped all the pieces on my bench with the half circle facing up and evened them out with sandpaper on a 1” dowel.

Moving on!
All of my brain power was being used to figure out the dowel drawer slides, so I decided to keep the rest of the joinery simple.
The whole base is butt joint together using screws, then plugged up with dowels.
Since the dowel plugs will be showing, I wanted to make sure they were all perfectly spaced out.
Instead of repeatedly marking all my pieces with combination squares or other marking tools, I decided to make a jig so I only had to do the layout measuring once.
I ripped a piece of plywood to the same thickness as my 2x2 material and drilled two holes where the screws will go. Then I put in some skinny little nails to use as my marking tool.
All I had to do was line up the jig to my pieces (making sure they were flush on all sides) and tap on the nails! This was really helpful in making sure all my holes were consistently spaced on all the parts.

After all the holes were marked I could predrill and countersink all the holes.

And glue and screw them together with the help of this corner clamp!

Instead of laying out where the bottom stretchers go, I used other pieces from the build as my reference guide. Using this corner clamp really help keep everything nice and square!

After it was all assembled I lined the dowel into the cut outs in the legs to mark it and cut it to length.

Once cut, I glued and clamped it into place!
I was a little concerned about the strength of this joint since there was a lot of end grain in the half circle cut out. So I decided to reinforce it with screws.

No one will really ever see this joint, but I wanted to make sure I was drilling in the center of the dowel.
To mark the center of the dowel, I used a similar jig I used for marking all the rest of the joinery.
I took one of the pieces I used as a test cut earlier (for the half circles) and drilled two holes in the center of the curve. Then I put little nails in there and I could line the jig around the dowel, tap with a hammer and done!
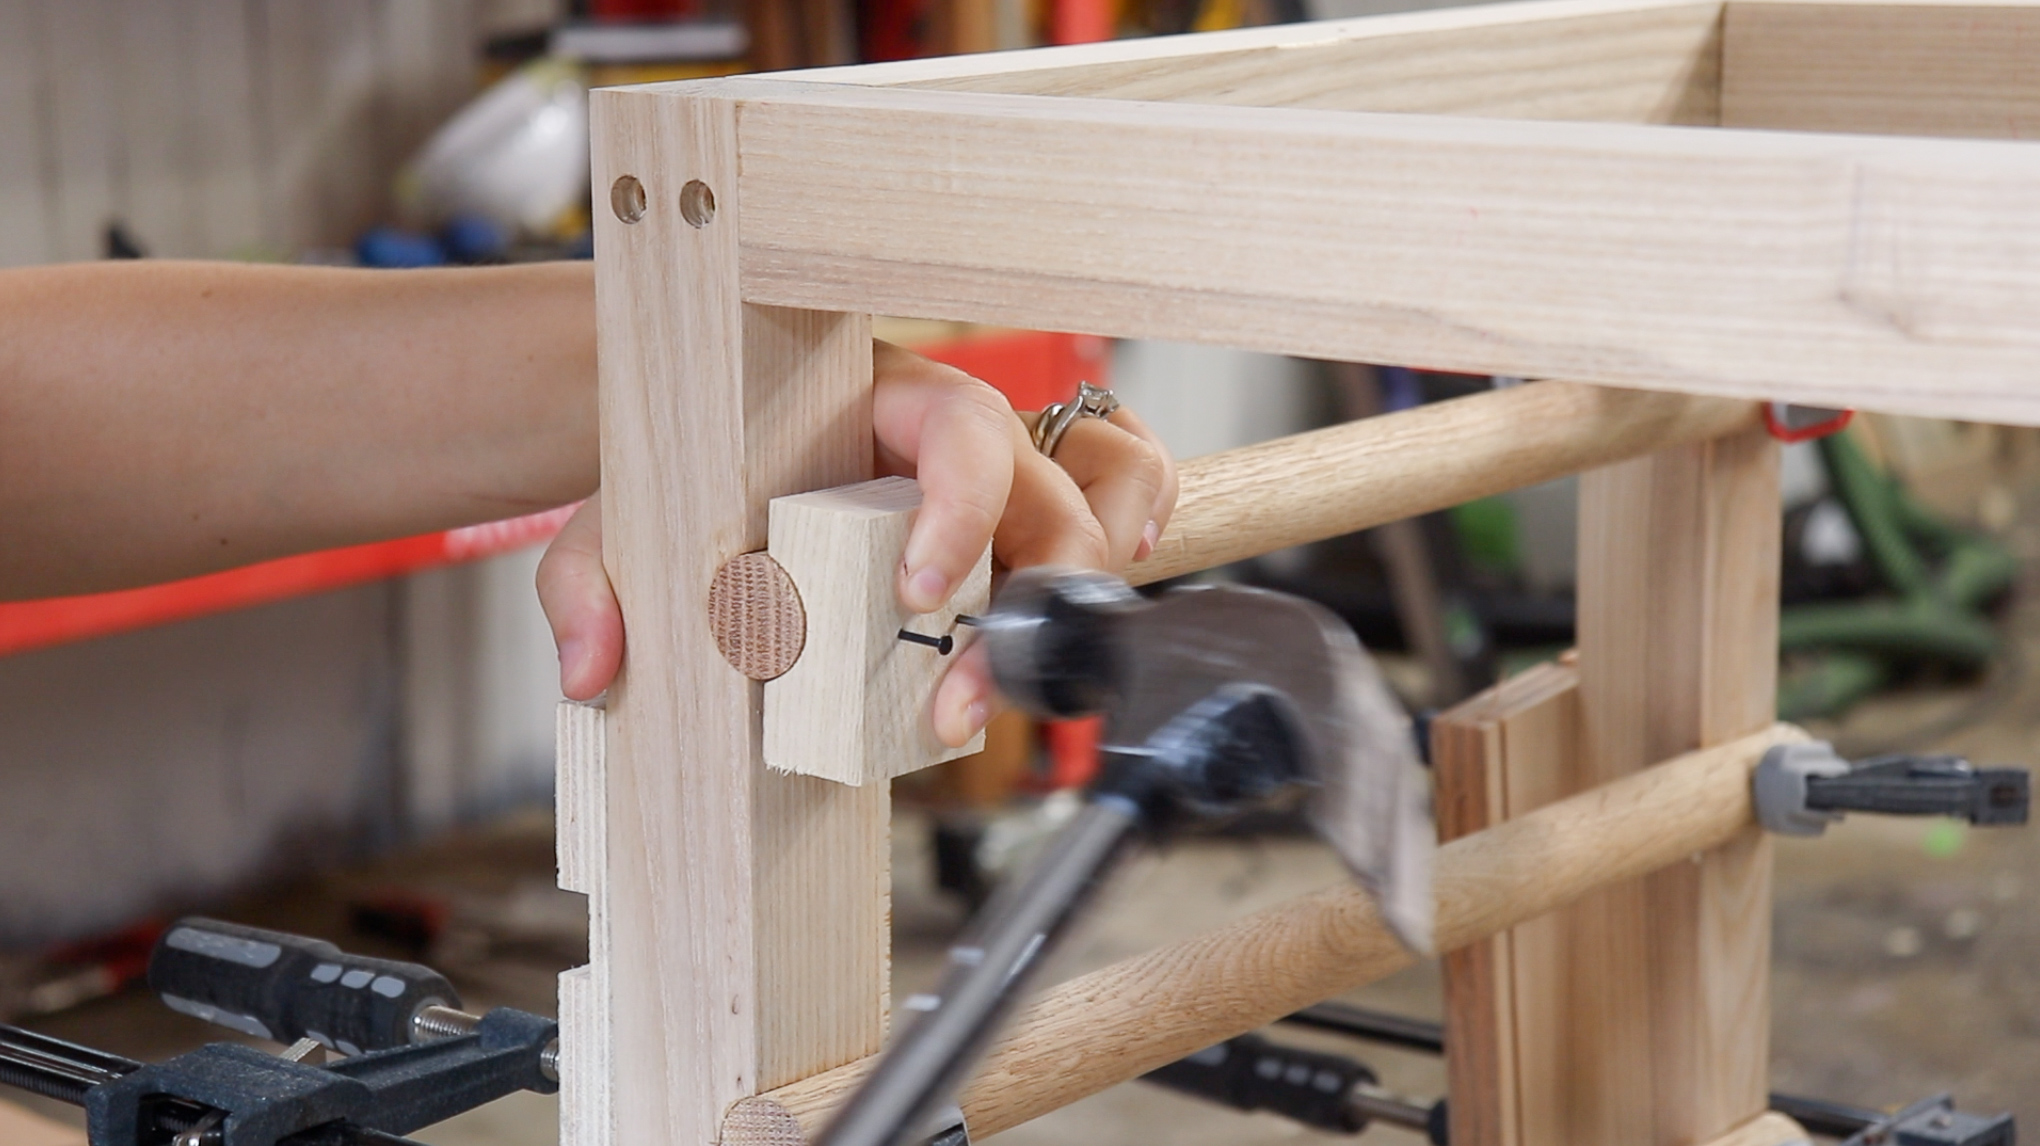
I predrilled and counter sunk all the holes then drove some screws in there.

After all the joinery was done I plugged all the holes with an oak dowel and cut them flush with a ryoba saw.

Next I built the drawers. For a full tutorial on how I built these drawers check out this post —> How to Build Drawers
Since I used the 1/8” spacer between the pieces when making the half circles in the legs, and I am going to make the same sized half circle on the drawer sides, the total gap between the legs and the drawers will be 1/4”. Since there are two if these gaps on either side of the drawer, I built my drawer to be 1/2” smaller than the drawer opening.

To make the half circle on the drawers I used a 1” core box bit in my router table.
I made some test cuts to make sure I was making the hole dead on center, then slowly ate away at the material by taking multiple passes until I got the perfect sized half circle.
I used one of my scrap test cuts from earlier to make sure I raised the bit to the perfect height.
I couldn’t believe how easy this was to do!

I really wanted to the dowel runners to be the showcase here so I decided to make some cut outs in the drawer fronts instead of using hardware.
To make sure all the cut outs were the same, I made a template.
I drilled two holes on a scrap using the same 1” forstner bit as before. Then I connected those two holes at the bandsaw and cleaned it up on the benchtop sander.

I marked the center of the cut out in the jig and the lined it up with center of the drawer front. Clamped it in place and used a flush trim bit in my palm router to make the cutouts on all the drawers.

Then I used a small roundover bit at the router table to make sure the drawer was evenly rounded over and all the building is done!

I decided to use Rubio Monocoat Pure to finish it since it is so easy to apply and I love that its zero VOC. This made the ash looks very orange and I think I should have used their Natural or maybe their White color to counteract this.
I painted the drawers a dark green, picking this color was actually harder than building the table… ha.

I used figure 8 table top fasteners to attach the top. These are really easy to use and allow for wood movement in the solid top.

I screwed the top into place and it was done!

I am so crazy happy with how this desk turned out. I had no clue if the dowels were going to work as drawer slides and to my surprise it worked amazingly well and it was easy to do!
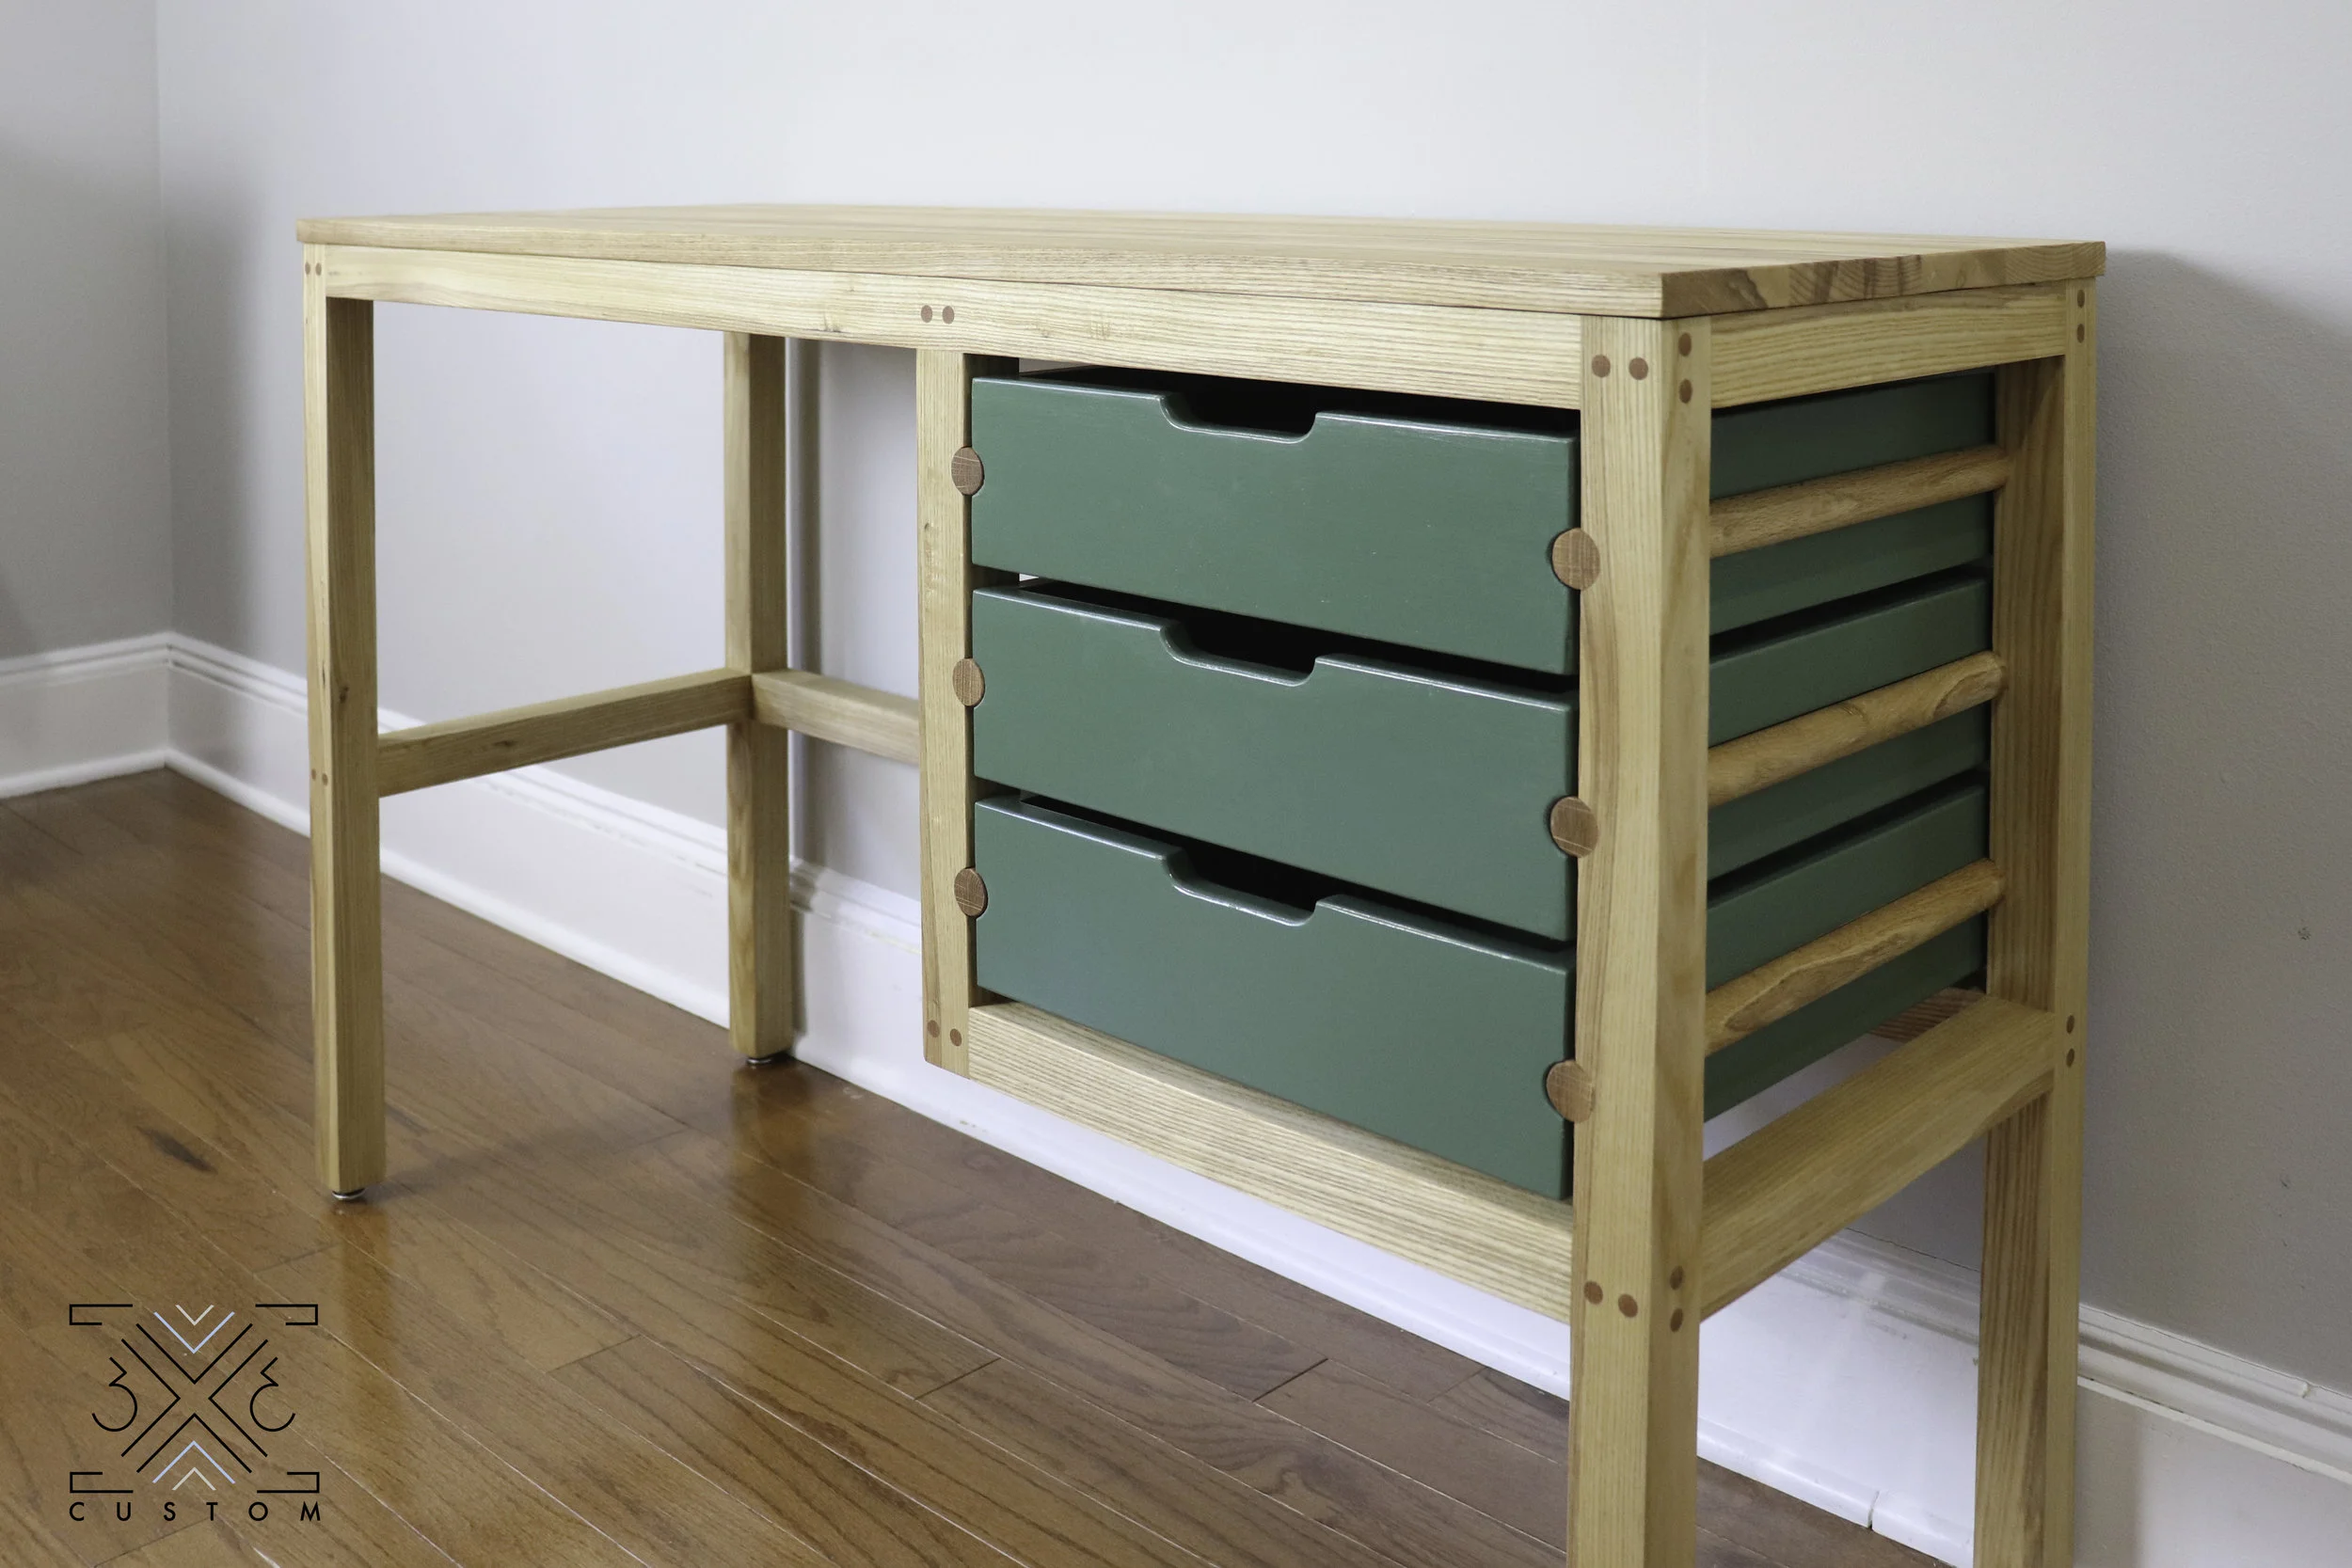
I love how the exposed dowel slides look on the front of the desk. It’s just so fun.
I had a tough time picking out this color green, but I’m super happy with it.
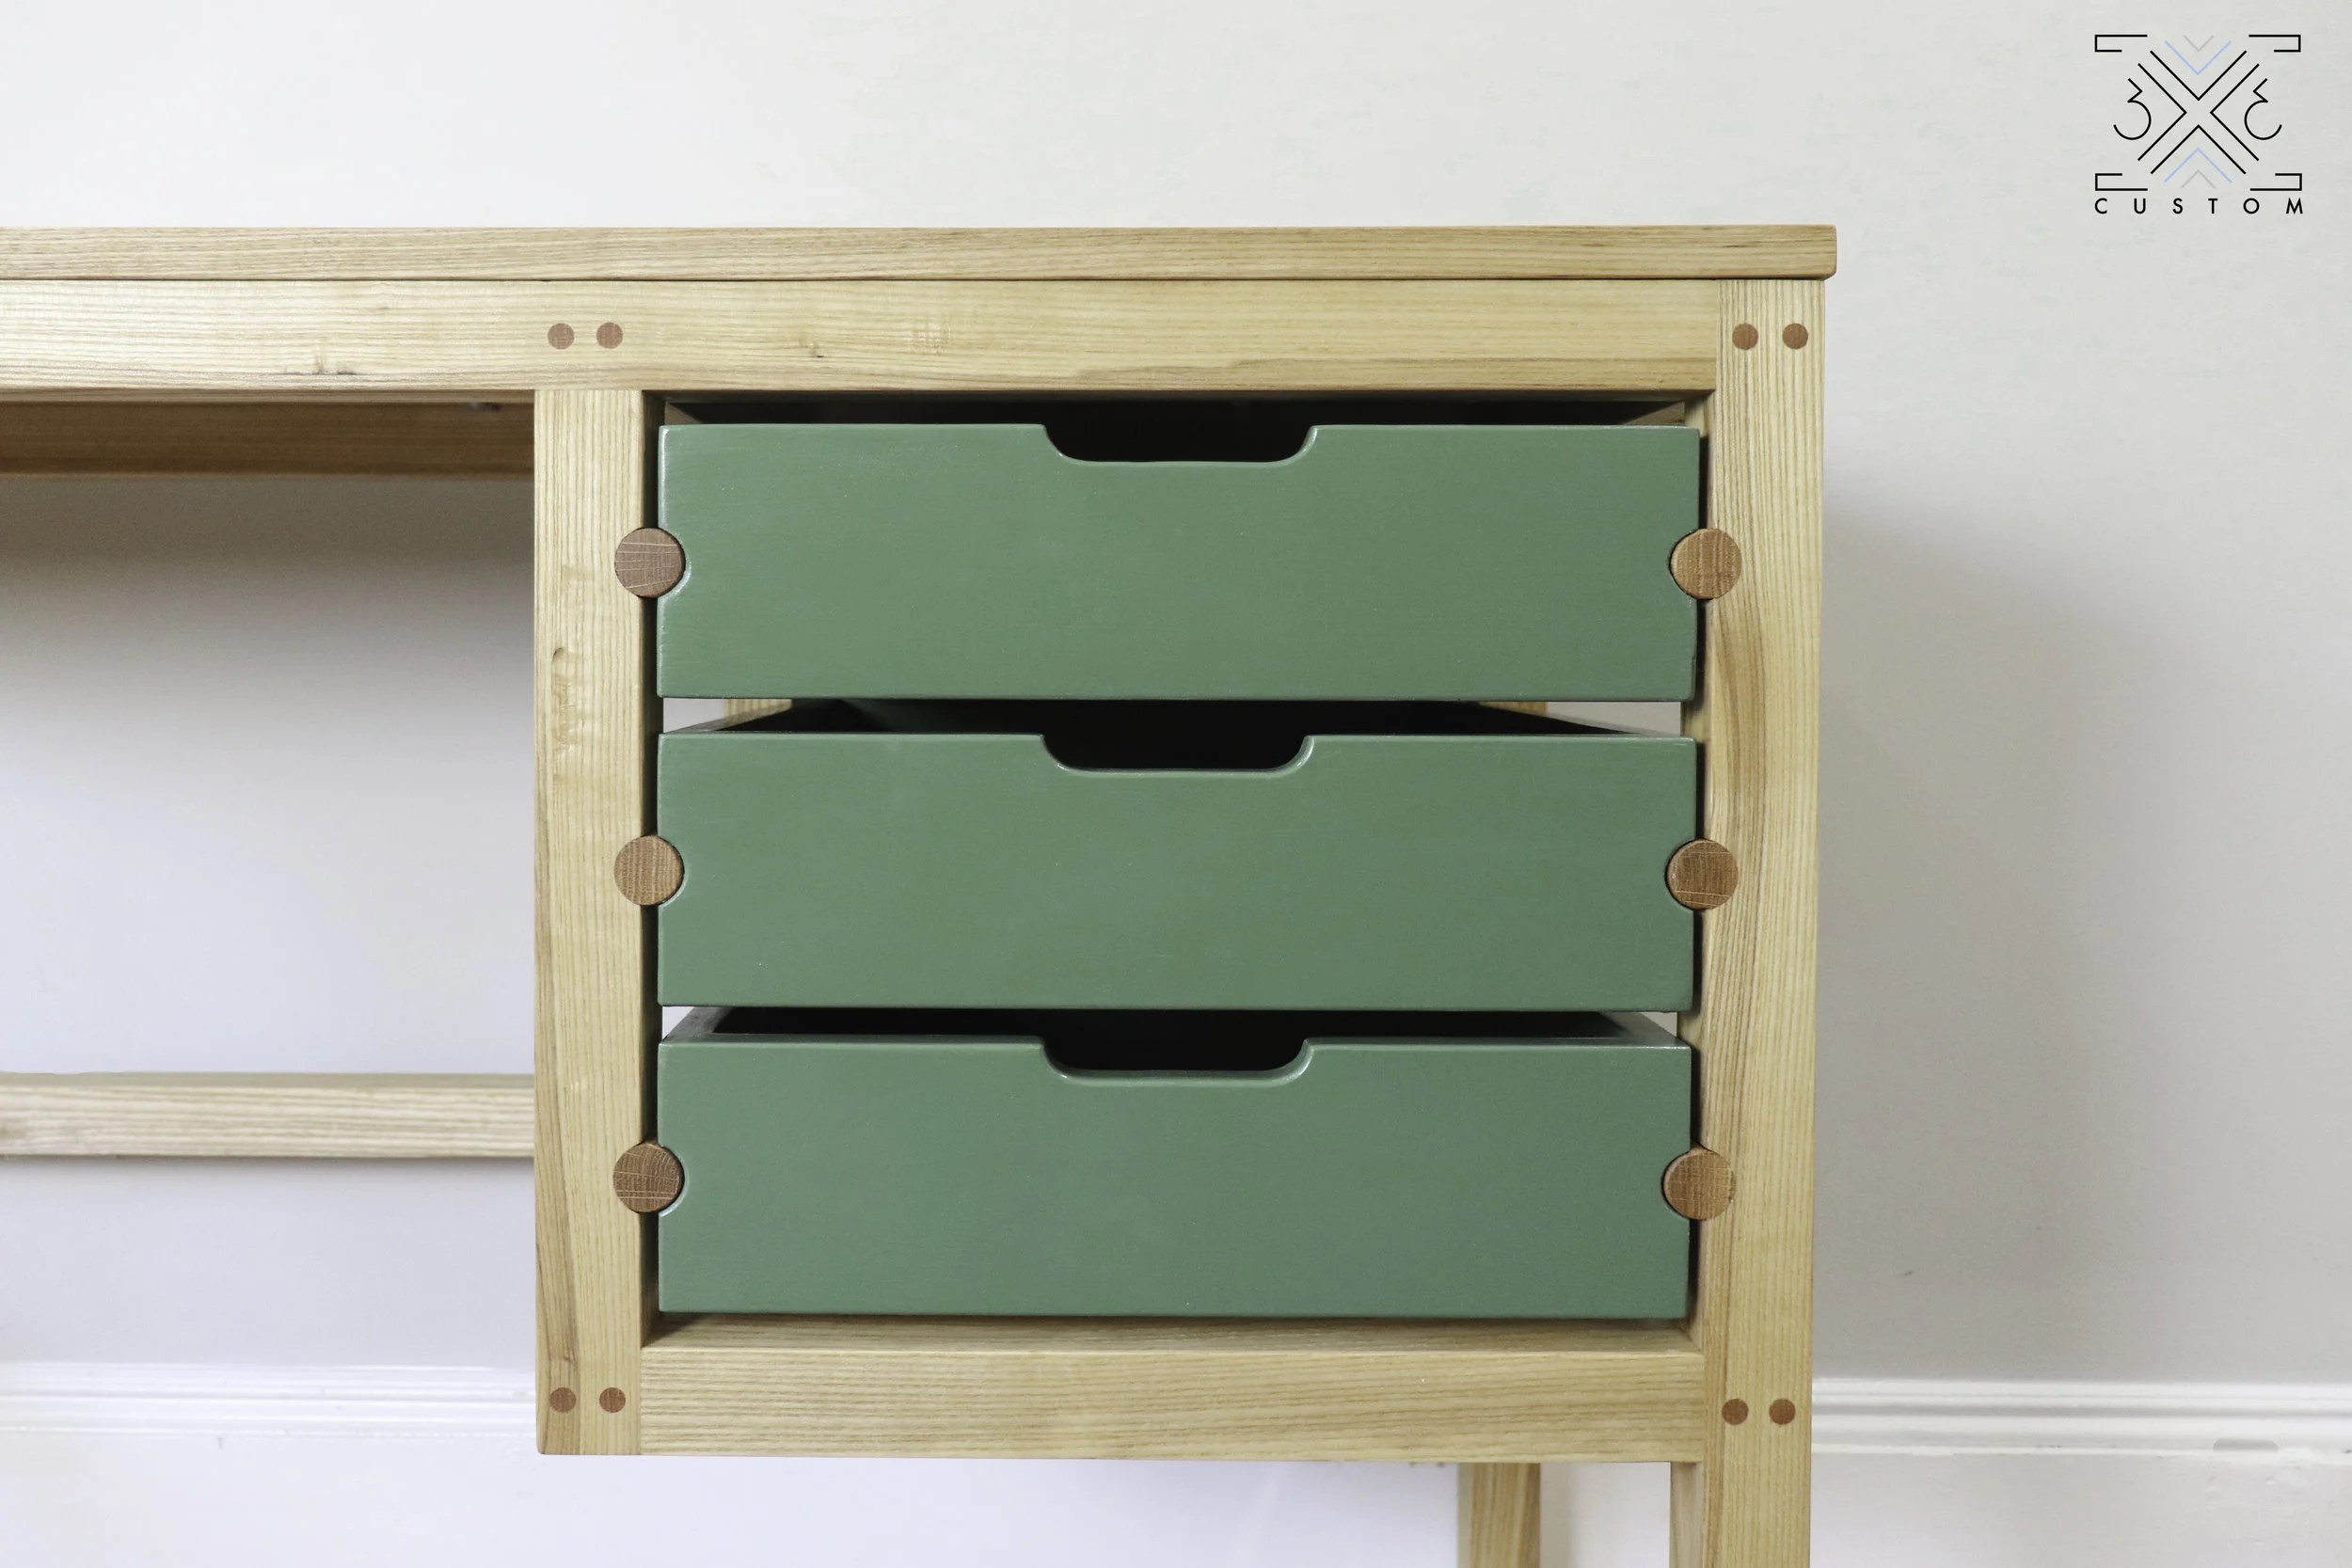
There is a perfect spacing between all these drawers and all the grain in the dowels line up together, it makes me so happy. I am also really happy I decided not to clutter op the drawer fronts with any hardware. The cut outs are perfect.

I can’t get over how well these dowel slides function. I am really looking forward to the next Instagram Builders challenge so I can challenge myself again with something I have never done before!
I acknowledge that The Home Depot is partnering with me to participate in the ProSpective 2018 Campaign. As a part of the Program, I am receiving compensation in the form of products and services, for the purpose of promoting The Home Depot. All expressed opinions and experiences are my own words. My post complies with the Worth of Mouth Marketing Association (WOMMA) Ethics code and applicable Federal Trade Commission guidelines.